
In the day and age where hackers and hacking tools are becoming more advanced and sophisticated with time, one has to take the security of their online social accounts way more seriously. While it is generally advisable to use strong and non-identical passwords for different accounts, things like these do little to protect your identity if you have saved your passwords in browsers or have to login using different computers. It is, therefore, recommended that you use your mobile as an extra layer of security for your accounts.
2-Step Authentication
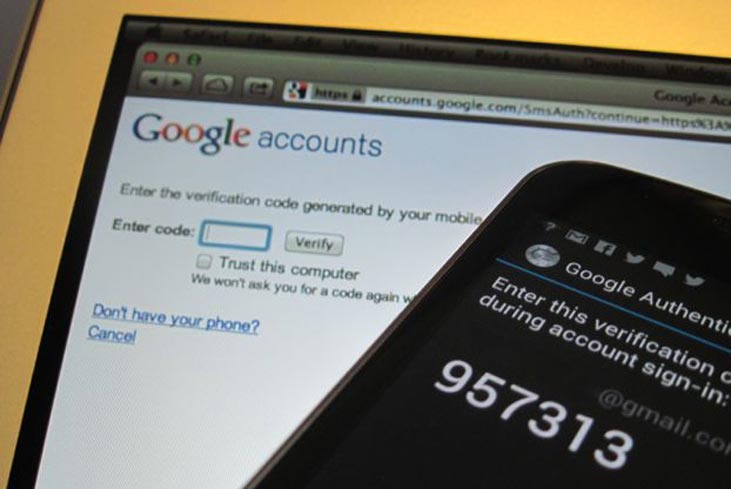
2-Step Authentication involves another layer of security that has to be authenticated alongside your normal password. This generally means another randomly-generated code that is either sent to your phone, or is generated using an app on your smartphone. If this method is activated for an account, say Google’s or Facebook’s, you’ll need that second code from your mobile to login. If someone steals your password, they still won’t be able to log into your account since they do not have that code.

2-Step Authentication can be activated for a number of social and personal accounts, like Google, Facebook, Apple ID, Microsoft accounts, Box, Dropbox, LastPass etc. We’re giving a step-by-step guide here to activate 2SA for your Google account using the companion app ‘Authenticator’.
Step 1
Fire up your browser and log into your Google account, if aren’t signed in already. The go to the Security Settings of your Google account via this link: https://www.google.com/settings/security
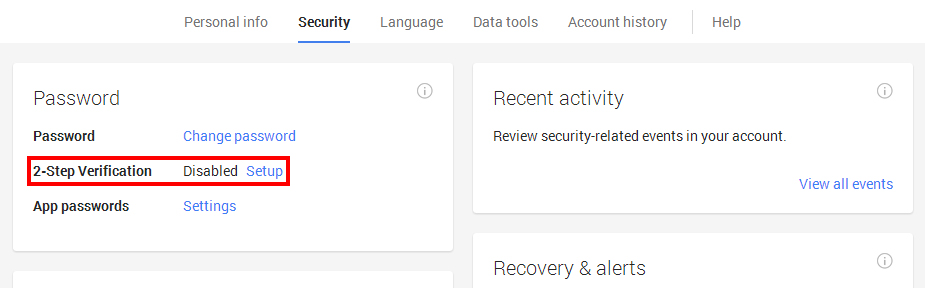
Once in the Security tab, hit the “Settings” link in front of the 2-Step Verification label under Password section.
Step 2
You’ll be redirected to the 2SA settings homepage. Hit “Start setup >>” button there to begin. You’ll then be asked to enter your password again. Enter it and hit “Sign in”.
Step 3
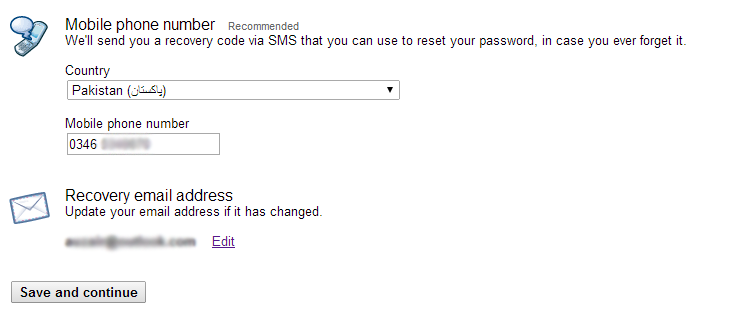
You’ll have to update/review your password recovery options in the next screen that appears. Review these settings or update them if necessary. Add your accessible phone number and some e-mail address. Once updated, hit “Save and continue”.
Step 4
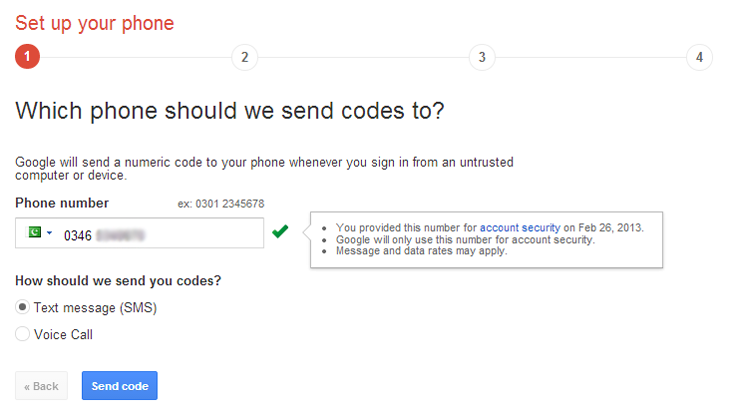
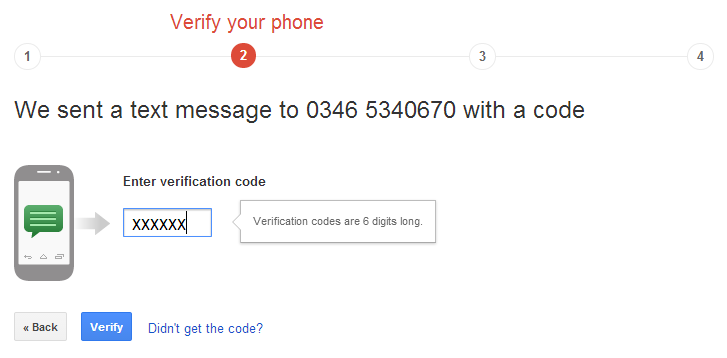
Next up, you’ll have to provide the phone number on which the secondary login codes will be sent whenever you or someone else tries to login from your account. Verify your number and choose an option from SMS or voice call. This is authentication step only, to ensure that you are in possession of the phone number you are entering.
A code will be sent on the phone number you provided once you hit “Send code”. Enter that code in the next step and hit the “Verify” button. After verification, you’ll be taken to the next step.
From the next screen that appears, select if the computer you’re logged in right now is trusted. If you check the option, you will not be asked for secondary verification codes on that computer again. If you are on a shared/non-personal computer, leave that option unchecked.
Hit “Next >>” and you’ll eventually be taken back to the Google account’s Security settings after confirmation.
So far, you have set up the 2-Step Verification for your account and the manner in which these codes will be sent to you. We’ll now set-up the Authenticator app to automatically generate the codes on your phone in-case you can’t receive the messages on your phone because of signal problem or if you lose the SIM card.
Step 5
Click on the “Settings” link in front of “2-Step Verification” label under Password section.

Step 6
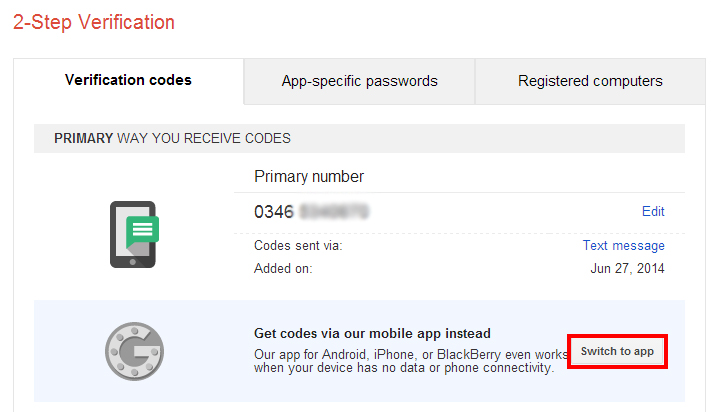
Under the “Primary way you receive codes” section, you’ll find your primary number and the option to set-up the Google Authenticator app. Hit the “Switch to app” button in the light blue box.
Step 7
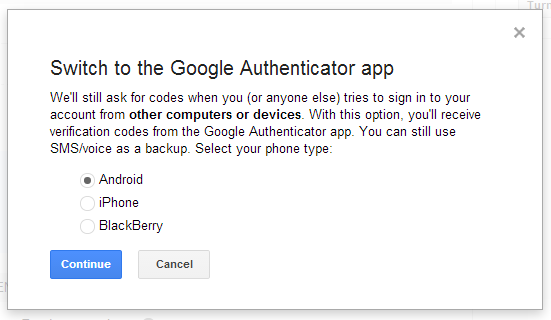
Select which type of smartphone you’ve got in the box that appears. You will be directed according to the smartphone type in the next step once you click “Continue” button after selecting the appropriate option. The procedure is similar for all, but we’ll continue with the “Android” option.
Follow the instructions provided on the next screen that appears. Summarily, you have to install “Authenticator” app on your smartphone (Google Play link) and configure it for your Google account by going to “Menu > Set up account” on the app on your smartphone once it is installed.
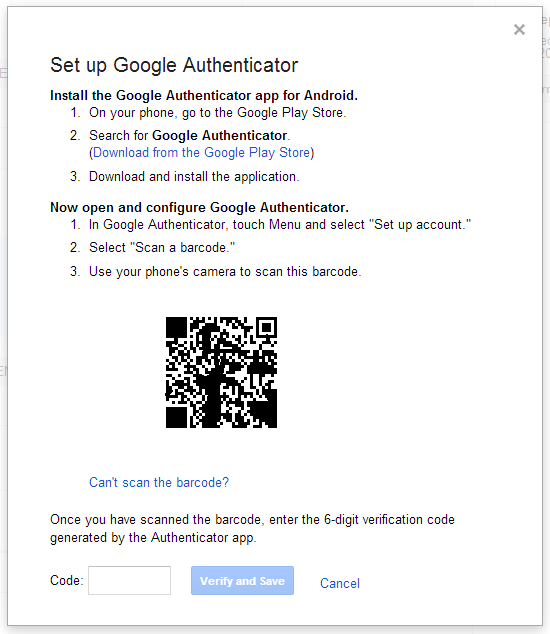
You’ll be given 2 options to set up an account on the mobile app: via Barcode scanning or via Security code. If you have a barcode scanner on your phone, you’ll be able to scan the one provided on the computer screen. If you don’t have one, you can either install one from Play Store, or go back and use the security code instead. To get the security code, click on “Can’t scan the barcode” option on your computer under the barcode. Duplicate the code that appears on the app, and you’re good to go.
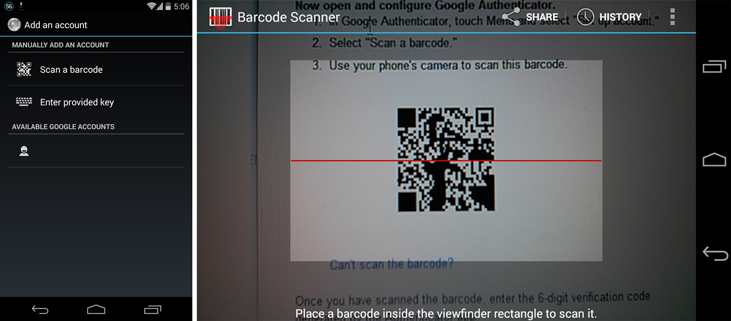
As soon as you set-up the account on app, you’ll start seeing the login codes which are randomized every 30 seconds. Enter the one that appears on the app into the textbox at the bottom of the verification screen on computer and hit “Verify”.
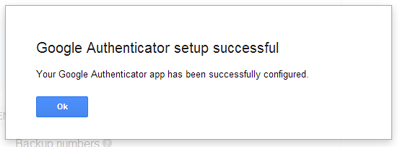
Remember, if the code expires during the time you are writing it on the computer, you’ll have to enter the new one which will be generated instantaneously. Once verified, your Authenticator app and 2-Step Authentication is ready. Authenticator app works without internet connection, so you don’t have to worry about WiFi or data network the next time you try to login to your account.
Step 8
Your 2SA is ready at this point, but what if you lose your mobile and are unable to login since you lost the SIM and the app with it? There is another method to get the codes, and that is randomly-generated 10 passcodes that you can printout and keep in your wallet/drawer/what have you. To get these codes, go to your 2-Step Verification page if you’re not there already, and find the “Backup codes” option. Hit the “Print or download” button there and you’ll be provided 10 backup codes. Note them down or have them printed out.
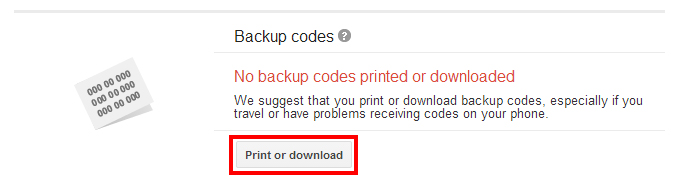
Remember that one code can work only once, so cross-out any used codes and occasionally generate new ones if you’re running out of them.
Step 9
Logout, and try logging into your Google account from some other computer, or the same one if you left the “Trust this computer” option unchecked in Step 4. After you enter your password, you’ll be asked to enter the 2-Step Verification code as well. To get this code, go to Authenticator app on your mobile, or use one from the list.
For other accounts
Based on the information provided in this walkthrough, you can set-up the 2SA for other accounts like Facebook, WordPress or LastPass as well. For Facebook, go to “Settings > Security > Login Approvals” and check the option there. Set your phone number up and once it is ready, go to “Settings > Security > Code Generator” and ‘Enable’ the third-party code generator.

Follow the same (Barcode scanning or security code) method in the Authenticator app and Facebook’s secondary codes will be generated in the same app as well.


 Warid’s Ramadan Offers – Pay Less Get More!