Facebook has suffered a swear blow over its role of spreading disinformation to the public on how it handles users’ data who sign-up on its platform. This Cambridge Analytica scandal hints that data of over 50 million Facebook account is said to be illegally accessed and Facebook has shed over $60 billion from its market value until now. The huge uproar from digital rights activists, regulators, and legislators for protection of users’ data is rising and even WhatsApp’s co-founder, Brian Acton has recently tweeted with a hashtag “#deletefacebook”.
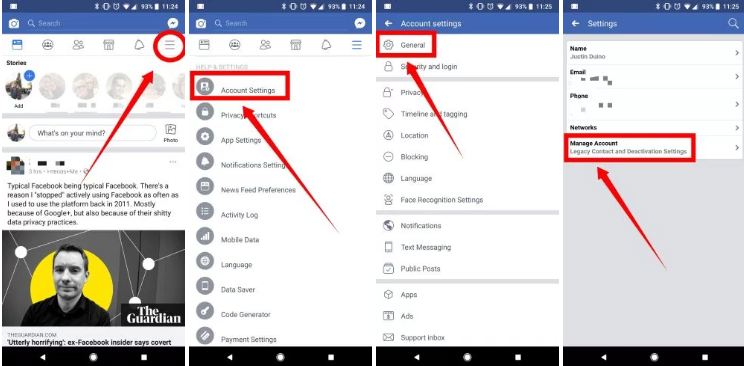
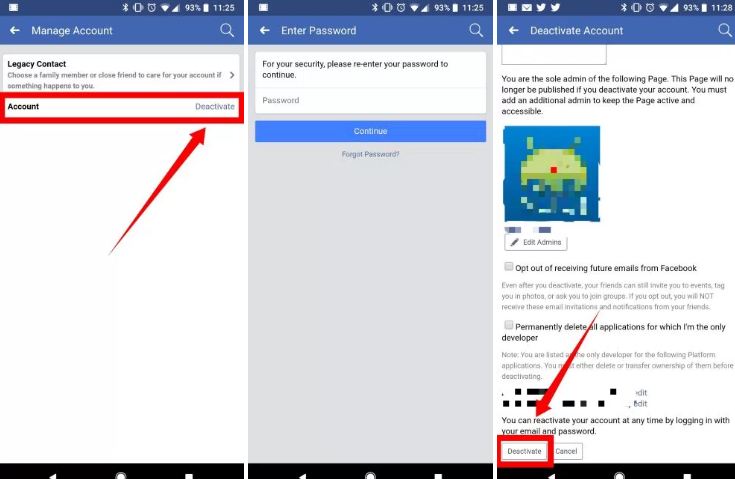
So in a case, if you have fallen out of love with Facebook, it’s easy to delete or deactivate your account. But before taking that bold decision here is an alternative through which you can disable Facebook’s data sharing to protect your information. If you still think that this would not be sufficient here’s our simple guide to permanently delete or temporarily deactivate your Facebook account.
Deleting your Facebook account from your phone is even easier than deactivating it. But first, remember, deleting your account is a permanent process and cannot be reversed.
In a case, if you want to save your Facebook data on your computer, tap on the down arrow next to your profile picture, and select Settings.
Below the list of options, you can click on Download a copy of your Facebook data. Select Start My Archive and the file will be downloaded to your computer.
Capable of conversing in both Chinese and English, Tencent’s large language model ‘Hunyuan’ is claimed…
Working on multiple AI models, Apple has allocated several teams who are working on artificial…
The world's largest offshore wind turbine has achieved a milestone by setting a new record…
YouTube is stepping into the world of gaming. YouTube has started testing out its gaming…
In a remarkable academic achievement, Abdullah Zaman, a Pakistani student hailing from Attock, has clinched…
Flying Bum, the world's largest aircraft is ready to launch in 2026. The Airlander 10…
Leave a Comment