Facebook has a nifty feature that allows you to, essentially, back up all your personal data on Facebook on your computer. This option allows you to download all your Facebook data. Before we move on ahead towards the actual guide, it is important to know what exactly is this Facebook data we speak of.
Basically, if you have ever wondered what exactly Facebook knows about you then Facebook data is the answer. It is an archive created by the social networking site that stores personal information about you, your photos, and your activity on Facebook.
What information does it store?
PROFILE INFORMATION:
The data contains your profile details such as your name, relationships, education, registration data, and even your relationship and work history.
STATUS AND MEDIA:
Every photo or video that you have taken, uploaded, or have been tagged in on Facebook plus every status that you have uploaded with the corresponding device’s IP address is all here.
FRIENDS YOU HAVE REMOVED OR FRIENDS THAT REMOVED YOU
One particularly interesting bit is that Facebook even stores the number and list of all friends that you have removed ever since the creation of your account.
AD DATA:
Lastly, Facebook even stores information about what it thinks are your interests as well as a list of all ads that you have clicked via Facebook!
How to download:
So, how do you actually download and access this data? We’ve made a quick guide to show you how:
1. From your profile home page, go to Settings.

2. Under General Account Settings, you will be able to see an option for ‘Download a copy of your Facebook data’. Click on it.

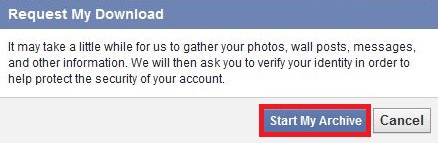
3. Facebook will redirect you to a Download page that will brief you about what’s included in your Facebook Data. Click on Start My Archive here.

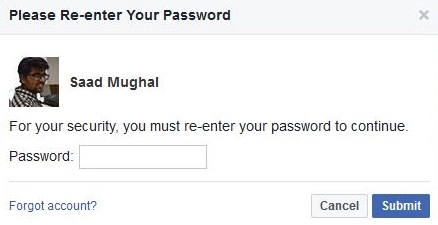
4. You will then be asked to enter your password in a prompt for security purposes.
5. Finally, Facebook will prompt you to confirm your request. Click on Start my Archive.
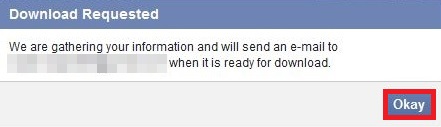
6. Your Facebook data will now be sent to your primary email address on Facebook. This will take variable time depending on the amount of information on your profile. On average, it takes around 10-15 minutes.
7. Once your data has been prepared, a .zip file will be sent to our email that contains your profile information and activity in .htm files and your media in appropriate formats.
Good luck backing up your Facebook information!